

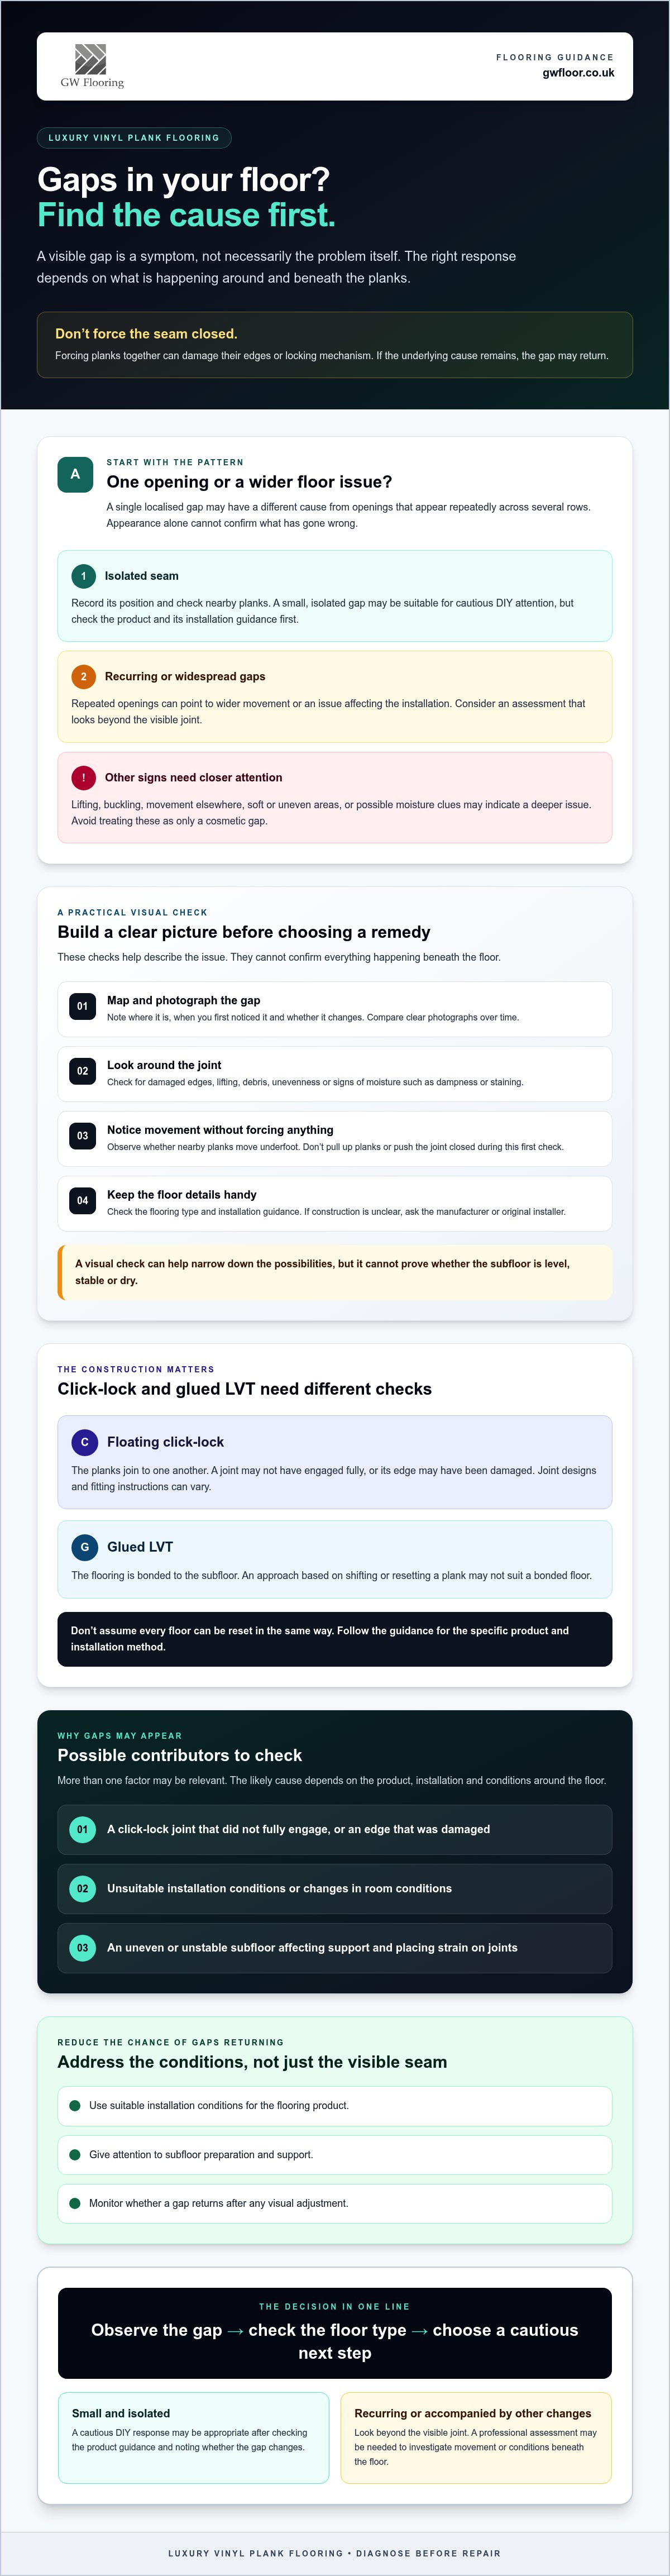
A gap in luxury vinyl plank flooring may be a symptom, not the problem itself. Before trying fixing gaps in luxury vinyl plank flooring with a tapping block or filler, find out why the planks have moved. Forcing them together can damage the edges or locking mechanism, and the gap may return if the underlying cause remains.
Gaps can spoil the look of a finished floor, especially when it’s unclear whether a DIY fix will last. Changes in room conditions, installation issues and an uneven or unstable subfloor can all contribute. The right response depends on what’s happening beneath and around the planks, not just how the gap looks.
This guide explains how to identify likely causes, which small, isolated gaps may be suitable for cautious DIY attention, and when widespread or recurring gaps call for professional assessment. It also covers why lifting, buckling or movement elsewhere in the floor can point to a deeper issue, helping you avoid a quick repair that risks causing more damage.
Key Takeaways
- Record where each gap appears and whether nearby planks move. This can help narrow down the cause.
- Check the flooring type and installation guidance before choosing an approach to fixing gaps in luxury vinyl plank flooring.
- A minor visual adjustment may not address movement or conditions beneath the floor. Monitor whether the gap returns.
- Recurring gaps or other changes to the floor may call for an assessment that looks beyond the visible joint.
- Suitable installation conditions and subfloor preparation can help reduce the risk of gaps developing again.
Why are gaps appearing in luxury vinyl plank flooring?
A flooring gap is an opened seam between planks. It can interrupt the neat, continuous look of a floor, but one visible opening doesn’t automatically mean the whole installation has failed. A plank may have moved, a joint may not have fully engaged, or something beneath the flooring may be affecting its support.
LVT and luxury vinyl plank products can differ in construction and installation method. For general background on vinyl flooring terminology, the Vinyl composition tile overview also discusses luxury vinyl plank. The likely cause of a gap depends on the specific product, how it was installed and the manufacturer’s instructions. Appearance alone can’t confirm what has gone wrong.
What can cause LVT plank seams to open?
A click-lock joint may not have engaged fully during installation, or its edge may have been damaged. That’s one possibility, not a diagnosis. Planks may also move if installation conditions weren’t suitable or if the subfloor wasn’t adequately prepared. An uneven or unstable base can affect how the floor is supported and place strain on joints as people walk across it. Don’t force a seam closed until you understand the product and installation method.
Look at the pattern. A single, localised opening may have a different cause from gaps appearing repeatedly across several rows. Repeated gaps can point to wider movement or an issue affecting the installation, rather than one imperfect joint.
How can you tell a small gap from a wider floor problem?
Record where the gaps are and when you first noticed them. Take clear photographs and note whether the openings change over time. Check nearby planks for raised edges, movement underfoot, unevenness or signs of moisture. A soft area, recurring gaps or lifting deserves closer investigation before you try a cosmetic fix.
These visual checks can help you describe the issue, but they can’t confirm what’s happening beneath the flooring. A gap that looks minor may still be linked to movement or the condition of the subfloor. Equally, an isolated seam may not indicate a wider fault. Fixing gaps in luxury vinyl plank flooring should start with understanding the cause, not simply hiding the opening. Keep the product details and installation guidance to hand before deciding what to do next.
How to diagnose gaps in luxury vinyl plank flooring before fixing them
Before choosing a remedy, build a clear picture of the gap. Diagnosis means identifying what caused the opening before deciding how to repair it. A careful visual check can help you describe the issue, but it can’t reveal every problem beneath the floor.
What should you inspect around an LVT gap?
Note the gap’s position and take a photograph so you can compare it later. Is it an isolated seam, or are openings appearing repeatedly along the same row? Check nearby plank edges for visible damage, lifting or debris. Without forcing the floor, notice whether surrounding planks seem to move underfoot. Look for possible moisture clues, such as dampness or staining, and note any uneven or soft areas.
Don’t pull up planks or try to push a joint closed during this first check. Force can damage an edge or locking profile, and disturbing the floor may make it harder to understand the original fault. Record when you first noticed the gap and whether it changes. If you suspect moisture, don’t treat the seam as a purely cosmetic issue.
Why do click-lock and glued LVT need different checks?
Floating click-lock planks are joined to one another, while glued LVT is bonded to the subfloor. A remedy based on shifting or resetting a plank may be unsuitable for a bonded floor. Joint designs and fitting instructions can also vary between click-lock products, so don’t assume every floor can be reset in the same way. Check the product’s installation guidance, or ask the manufacturer or original installer if you’re unsure how the floor is constructed.
Environmental changes are also worth noting, particularly if gaps appear or change alongside shifts in room conditions. The NWFA guidance on humidity discusses gaps in wood flooring, so treat it as general background rather than instructions for LVT. Follow the guidance for your specific floor.
These checks help you gather useful information before fixing gaps in luxury vinyl plank flooring, but they don’t prove whether the subfloor is level, stable or dry. If the construction remains unclear, or you’re considering new LVT and suitable subfloor preparation, explore LVT flooring and subfloor preparation from a Rayleigh-based business serving Essex.
DIY gap fixes versus professional LVT assessment: which is appropriate?
A small gap can tempt you to push the planks together and move on. But a seam that looks closed isn’t necessarily fixed. If movement, a damaged joint or a problem beneath the floor caused it, the opening may return. Choose your next step based on the floor’s condition and product guidance, not just on whether the gap seems easy to reach.
When might a careful homeowner check be reasonable?
Keep initial DIY checks simple. Look for loose debris at the visible seam and consult the flooring manufacturer’s care or installation instructions. Only consider a plank-reset method if the manufacturer confirms it suits your exact product and installation. Don’t force a resistant plank, use improvised adhesive or apply filler without checking compatibility. These shortcuts can damage a locking edge or make a later repair harder.
Stop if the joint won’t move easily, the plank edge looks chipped or crushed, or the gap returns after any manufacturer-approved adjustment. A temporary improvement changes what you can see; it doesn’t prove the underlying cause has been resolved. Be particularly cautious if you don’t know whether the LVT is floating or bonded. Movement-based methods may not be appropriate for glued-down flooring.
When should a flooring professional inspect the floor?
Seek an inspection if gaps recur, appear across several rows, progressively widen or occur alongside lifting, movement, unevenness or suspected moisture. These signs may indicate that the issue needs more than a surface-level adjustment. Avoid covering a persistent gap before the cause is understood, as this can obscure useful evidence about how the floor is behaving.
A proper assessment considers the visible joint, the installation and the surface beneath it. Depending on what’s found, the remedy might require access to the affected area or attention to the underlying floor, rather than simply closing the seam. Fixing gaps in luxury vinyl plank flooring is more likely to last when the response matches the cause.
If you’re unsure whether a repair is suitable, gather the product details, photographs and notes on how the gap has changed. A flooring professional can use this information to discuss whether they assess existing LVT and what further inspection may be appropriate. Confirm the scope before arranging work, as not every flooring installer undertakes standalone plank repairs.
How to reduce the chance of LVT gaps returning
Prevention starts before the planks go down. Suitable installation conditions and a properly prepared subfloor help support the flooring and its joints. Levelling or other preparation should suit the surface at the property and the requirements of the specific product, rather than follow a one-size-fits-all approach. For a broader look at the groundwork involved, read this professional floor installation guide.
Why does subfloor preparation matter for LVT joints?
An uneven or unsuitable surface can leave parts of the floor without consistent support. Depending on the product and installation method, this may affect how planks sit and how their joints perform underfoot. Preparation might involve screeding or plyboarding, but these options should suit the floor, site conditions and manufacturer’s requirements. The LVT installation guide for Essex offers more context on planning an installation.
Good preparation isn’t simply about making a surface look level. The installer needs to consider whether it’s suitable for the chosen flooring system and address relevant issues before installation. Skipping that groundwork can leave the finished floor vulnerable to problems that a surface-level adjustment won’t solve.
Which installation details should be checked with the manufacturer?
Don’t assume every LVT product needs the same preparation or fitting conditions. Check the current manufacturer instructions for acclimatisation, room conditions, expansion allowances and the correct installation method. Requirements vary by product, so avoid relying on a generic time period or gap measurement. If information is missing, ask the manufacturer or installer to confirm what applies to your flooring.
Keep the product name, installation instructions and installer details together. If a seam opens later, these records can help identify the correct guidance and clarify how the floor was fitted. They’re especially useful if the product or installation method isn’t obvious from the surface.
With over 20 years of flooring experience, family-run GW Flooring supplies and installs LVT and offers subfloor preparation across Essex, including screeding or plyboarding where appropriate. If you’re planning a new floor or replacement, explore LVT installation and subfloor preparation and discuss what the site may need before work begins. Thoughtful preparation supports a lasting result when fixing gaps in luxury vinyl plank flooring, because the visible finish depends on what supports it underneath.
What to do next if your luxury vinyl plank flooring has gaps
A clear record of the problem makes it easier to decide what advice you need. Before attempting fixing gaps in luxury vinyl plank flooring, document what you can see, identify the product if possible and check its instructions. If the gaps are changing or there are signs of movement or moisture, include those details when seeking advice.
What information should you prepare before asking for advice?
Gather a few practical details to help explain the issue:
- Location: Note the room and approximate position of each gap. Record whether there’s one opening or several, and whether they follow a particular row.
- Timing: Write down when you first noticed the gap and whether it has widened, returned or changed.
- Flooring details: Look for the brand or product information, and keep any installation paperwork or manufacturer instructions you still have.
- Photographs: Take clear, well-lit images of the seam and surrounding floor, including any raised edges, uneven areas or visible moisture clues.
For now, stick to a visual check. Don’t lift planks or force a joint to move just to gather more information. The product details can help establish whether the floor is floating or bonded and which guidance applies.
How can Essex homeowners explore professional flooring help?
An assessment should consider more than the visible seam. The joint may be affected by the way the planks are fitted, and the floor beneath them may also need attention. Finding out what can be seen and what may require further inspection helps guide the next step. Not every flooring business undertakes standalone repairs to existing LVT, so ask about the scope of work before arranging a visit.
GW Flooring is a family-run flooring business based in Rayleigh, serving customers across Essex. With over 20 years of flooring experience, the company supplies and installs LVT and offers subfloor preparation, including screeding or plyboarding where appropriate. This is relevant if your findings lead you to consider replacement or a new installation, where the condition of the underlying floor is an important part of planning.
If you’re in Essex, contact GW Flooring about an assessment and explain what you’ve observed. Ask whether they can assess your existing floor and what that would involve. There’s no need to commit to a repair before you understand the options.
Choose a lasting next step for your LVT floor
A gap is a clue, not a diagnosis. Before fixing gaps in luxury vinyl plank flooring, note where the seams have opened, check whether they’re changing and consult the product guidance. A minor, accessible joint may need only a cautious check, while recurring gaps, movement, raised edges or soft areas deserve closer attention.
The most reliable next step depends on what’s causing the opening. Closing a seam may improve the appearance, but it won’t resolve an issue with the joint or the floor beneath it. Keep the product details and photographs handy when asking for advice, and don’t force planks or use unapproved materials.
GW Flooring is a family-run business based in Rayleigh, Essex, with over 20 years of flooring experience. The team supplies and installs LVT and offers subfloor preparation, useful expertise if you’re considering a replacement or planning a new floor. Contact GW Flooring to discuss your LVT flooring and ask what advice may be appropriate for your situation. The team can also bring samples to your home or business to help you explore flooring options. With the cause understood, you can move towards a floor that looks considered and feels right for your home.
Frequently Asked Questions
Can you fix gaps in luxury vinyl plank flooring yourself?
Sometimes, but first identify the flooring system and check the manufacturer’s instructions. A small, accessible issue may allow a careful visual check, but forcing planks together can damage locking edges or hide a deeper cause. Don’t attempt a reset unless the guidance confirms it’s suitable for your product. If gaps recur, appear across several areas, or come with movement, lifting or suspected moisture, stop and seek a professional assessment.
Why are gaps appearing between my LVT planks?
Gaps can have several causes, including a joint that hasn’t engaged properly, plank movement, damaged edges, unsuitable installation conditions or an issue with the subfloor. The visible seam alone can’t confirm which applies. Note whether the gap is isolated or repeated, and look for nearby lifting or movement. Checking the flooring type and installation guidance can help you decide what information to share before choosing a remedy.
Will gaps in click-lock vinyl flooring keep coming back?
They may return if the cause remains, such as ongoing movement, a damaged joint or a problem with the supporting surface. Closing a seam without investigating why it opened may only improve the appearance temporarily. Photograph the gap and monitor whether it changes. If it reappears after an adjustment or similar openings develop elsewhere, avoid repeatedly pushing it closed and seek advice about the floor’s condition.
Can you fill gaps in luxury vinyl plank flooring with sealant?
Don’t assume sealant is suitable. The right approach depends on the product, the installation method and the location of the gap. An unsuitable filler may affect the floor’s appearance or interfere with how it performs. Check the manufacturer’s instructions before applying any product. If the seam keeps returning or nearby planks move, investigate the underlying cause rather than simply filling the opening.
Should LVT flooring have expansion gaps?
Some flooring systems require perimeter or other expansion allowances, but the details depend on the product and its installation instructions. Don’t rely on a generic measurement or assume every floor is fitted in the same way. If you think an allowance has been omitted or covered, check the manufacturer’s guidance and ask a flooring professional to assess the installation before altering skirting or attempting to move planks.
When should I call a flooring professional about LVT gaps?
Seek professional advice if gaps keep returning, appear across multiple rows, widen, or occur with raised edges, movement, unevenness or suspected moisture. These signs may need more than a surface adjustment. Share photographs, product details and any installation paperwork so the professional can consider both the visible joints and the floor beneath them. Essex homeowners should confirm whether a flooring business assesses existing LVT before arranging work.
Can an uneven subfloor cause gaps in luxury vinyl plank flooring?
An unsuitable or uneven subfloor can affect how the flooring is supported, but it isn’t the only possible cause of gaps. Assessment should consider the surface, installation method and product requirements together. Levelling isn’t automatically the answer: preparation such as screeding or plyboarding needs to suit the site and flooring. If the floor feels uneven or soft, avoid forcing planks and seek advice before attempting a repair.


